





magine having the ability to transcribe voice calls. Look no further because we’ll learn how to do that in this article by combining Vonage with Deepgram.
With Vonage, we can use one of their phone numbers to receive and record incoming calls and get a transcript using the Deepgram Speech Recognition API. We’ll use the Deepgram Python SDK in this example.
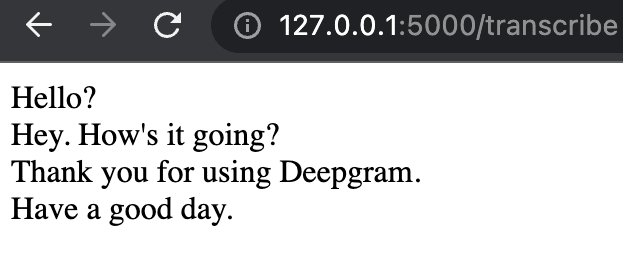
Here’s a snapshot of what we’ll see in the browser after making the phone call and using Deepgram voice-to-text.
Getting Started
Before we start, it’s essential to generate a Deepgram API key to use in our project. We can go to the Deepgram console. We’ll make sure to copy it and keep it in a safe place, as we won’t be able to retrieve it again and will have to create a new one. In this tutorial, we’ll use Python 3.10, but Deepgram supports some earlier versions of Python.
Then we’ll make sure to go to Vonage and sign up for an account. We’ll need to purchase a phone number with voice capabilities of type mobile.
We’ll also need two phones to make the outgoing call and another to receive a call.
In the project, we’ll use Ngrok, which provides a temporary URL that will act as the webhook in the application. Ngrok will forward requests to the application that is running locally. We can download it here.
Next, we’ll make a directory anywhere we’d like.
mkdir deepgram-vonage
Then we’ll change into that directory so we can start adding things to it.
cd deepgram-vonage
We’ll also need to set up a virtual environment to hold the project and its dependencies. We can read more about those here and how to create one. It’s recommended in Python to use a virtual environment so the project can be installed inside a container rather than installing it system-wide.
We need to ensure the virtual environment is activated because we’ll install dependencies inside. If the virtual environment is named venv, then we’ll need to activate it.
source venv/bin/activate
We’ll install the dependencies for the project by running the below pipinstalls from the terminal inside the virtual environment.
 pip install deepgram-sdk
 pip install vonage
 pip install python-dotenv
 pip install Flask
 pip install 'flask[async]'
 pip install pysondb
We now can open up an editor and create a file called deepgram-vonage-call.py.
The Code
Now to the fun part! Open the script called deepgram-vonage-call.py and add the following code to make sure the Flask application runs without errors:
from flask import Flask

app = Flask(__name__)

@app.get("/")
def hello():
    return "Hello World!"

if __name__ == "__main__":
    app.run(port=5000)
We’ll run the Flask application by typing this into the terminal python deepgram-vonage-call.py.
Then we’ll pull up the browser window by going to http://127.0.0.1:5000/and we should see the text Hello World.
At the same time the application is running, we’ll open a new terminal window and type:
ngrok http 127.0.0.1:5000
Here’s a snapshot of the terminal running with ngrok:

We’ll create a Vonage application in the Vonage API Dashboard by going to Applications -> Create a new application.
We’ll give the application a friendly name that’s meaningful and easy to remember. We’ll call it Deepgram Vonage.
We’ll also need to generate a private key by clicking the button Generate public and private key. Add
the private key to the same level directory as the python deepgram-vonage-call.py file.
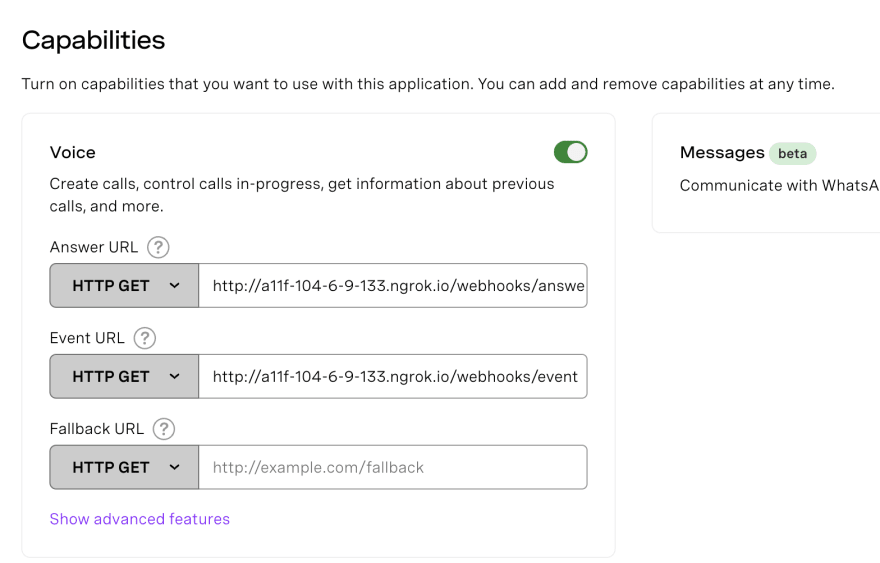
Next, under the section Capabilities toggle on the Voice option. We’ll add the following webhooks, with the ngrok url
and endpoints to the Answer URL and the Event URL. Please note that everyone has a different ngrok url.
http://a11f-104-6-9-133.ngrok.io/webhooks/answer
http://a11f-104-6-9-133.ngrok.io/webhooks/event
We’ll implement the endpoints in a few.
Leave both terminals running as those are needed to run the application and receive the phone call.
Then we’ll store the environment variables in a .env file with the following:
DEEPGRAM_API_KEY=[‘DEEPGRAM_API_KEY’]
VONAGE_NUMBER=['VONAGE_NUMBER']
RECIPIENT_NUMBER=['RECIPIENT_NUMBER']
VONAGE_APPLICATION_ID=['VONAGE_APPLICATION_ID']
VONAGE_APPLICATION_PRIVATE_KEY_PATH=['PATH_TO_PRIVATE_KEY']
Replace DEEPGRAM_API_KEY with the API key we received from signing up in the Deepgram console, and the RECIPIENT_NUMBER is the phone number we would like to receive the call.
We’ll replace the code in deepgram-vonage-call.py with the following:
import json
import os
import vonage
from flask import Flask, request, jsonify, render_template
from deepgram import Deepgram
from pysondb import db
from dotenv import load_dotenv


load_dotenv()

app = Flask(__name__)

calls_db=db.getDb('calls.json')

RECIPIENT_NUMBER = os.getenv("RECIPIENT_NUMBER")
VONAGE_NUMBER = os.getenv("VONAGE_NUMBER")
VONAGE_APPLICATION_ID = os.getenv("VONAGE_APPLICATION_ID")
VONAGE_APPLICATION_PRIVATE_KEY_PATH = os.getenv("VONAGE_APPLICATION_PRIVATE_KEY_PATH")
DEEPGRAM_API_KEY = os.getenv("DEEPGRAM_API_KEY")

client = vonage.Client(
    application_id=VONAGE_APPLICATION_ID,
    private_key=VONAGE_APPLICATION_PRIVATE_KEY_PATH,
)


@app.get("/webhooks/answer")
def answer_call():
    ncco = [
        {
            "action": "talk",
            "text": "Hi, we will shortly forward your call. This call is recorded for quality assurance purposes."
        },
        {
            "action": "record",
            "eventUrl": ["http://a11f-104-6-9-133.ngrok.io/webhooks/recordings"]
        },
        {
            "action": "connect",
            "eventUrl": ["http://a11f-104-6-9-133.ngrok.io/webhooks/event"],
            "from": VONAGE_NUMBER,
            "endpoint": [
                {
                    "type": "phone",
                    "number": RECIPIENT_NUMBER
                }
            ]
        }
    ]
    return jsonify(ncco)
Here we are importing the libraries and creating a new instance of a Flask application. Then we create a new database named calls. We are using a lightweight JSON database called PysonDB.
We create the /webhooks/answer endpoint, which allows us to make a voice call, connect to the Vonage number and record the call.
Next, in the /webhooks/recordings route below, we tap into Deepgram’s speech-to-text feature by getting the recording of the call and using speech recognition to transcribe the audio. We check if results is in the response and format it by using a list comprehension and storing the results in utterances. We then add the utterances to the calls database. We return an empty dictionary in the /webhooks/event endpoint.
@app.post("/webhooks/recordings")
async def recordings():
    print("recordings endpoint")
    deepgram = Deepgram(DEEPGRAM_API_KEY)
    data = request.get_json()

    response = client.get_recording(data['recording_url'])

    source = {'buffer': response, 'mimetype': 'audio/mp3'}
    transcript_data = await deepgram.transcription.prerecorded(source, {'punctuate': True,
                                                                        'utterances': True,
                                                                        'model': 'phonecall',
                                                                        'multichannel': True
                                                             })


    if 'results' in transcript_data:
        utterances = [
            {
                'channel': utterance['channel'],
                'transcript': utterance['transcript']
            } for utterance in transcript_data['results']['utterances']
        ]

        calls_db.addMany(utterances)

        return json.dumps(utterances, indent=4)

    return "webhook received"


@app.get("/webhooks/event")
def on_event():
    return jsonify({})
We can see how the utterances will look after they’re formatted:
[{'channel': 0, 'transcript': 'Hello?', 'id': 288397603074461838},
{'channel': 1, 'transcript': 'Hey. How's it going?', 'id': 109089630999017748},
{'channel': 0, 'transcript': 'Thank you for using Deepgram.', 'id': 124620676610936565},
{'channel': 1, 'transcript': 'Have a good day.', 'id': 182036969834868158}]
Lastly, we’ll add the /transcribe route and a templates folder with an index.html file that will display the phone speech-to-text transcript.
In the Python file, we’ll add the following code to get the voice-to-text transcript from the database and render them in the HTML template.
@app.get("/transcribe")
def transcribe_call():
    context = calls_db.getAll()
    return render_template("index.html", context=context )

if __name__ == '__main__':
    app.run(port=5000)
We’ll create a folder in the project directory called templates and add an index.html file. In that file, we’ll add the following HTML and Jinja code:
<!DOCTYPE html>
<html lang="en">
<head>
   <meta charset="UTF-8">
   <meta http-equiv="X-UA-Compatible" content="IE=edge">
   <meta name="viewport" content="width=device-width, initial-scale=1.0">
   <title>Transcript</title>
</head>
<body>
   {% for c in context %}
       {{ c.transcript }} <br/>
   {% endfor %}
</body>
</html>
Then we’ll loop through every transcript and display it on the screen.
Finally, we’ll try making a phone call and using the non-Vonage phone to initiate a phone conversation with the phone number we provided in the environment variable VONAGE_NUMBER. We should be able to receive a call and engage in a conversation. After we hang up, the transcript will appear in the browser when we navigate to http://127.0.0.1:5000/transcribe.
Congratulations on building a speech-to-text Python project with Vonage and Deepgram!


